Digitizing embroidery design opens up endless possibilities for turning artwork into stitched reality, helping hobbyists and small businesses bring ideas to life. Whether you’re converting a beloved logo, a botanical illustration, or a simple monogram, the embroidery digitizing process matters for clean, professional results. To get started, explore digitizing embroidery software and learn how stitch types, density, and underlays influence outcomes. This quick start guide is designed for makers, hobbyists, and small-business operators who want practical steps they can apply right away. By combining careful planning with test stitches, you’ll build a reliable workflow that improves sew-outs across fabrics and threads.
In other words, the craft of turning artwork into stitch-ready data can also be described as embroidery digitization, stitch-path creation, or machine-ready file preparation. Using vector-to-embroidery digitizing approaches helps preserve edges when scaling designs, while optimizing for fabric and hoop constraints. When you study stitches for embroidery digitizing, you learn how underlays, density, and color changes come together to form durable results. For newcomers, the beginner’s guide to embroidery digitizing offers approachable steps, samples, and practice projects to build confidence before you stitch anything precious.
Digitizing embroidery design: From concept to stitch-ready files
Digitizing embroidery design starts with a concept and ends as a stitch-ready file. In practice, you translate artwork into machine paths by planning the embroidery digitizing process: outlining shapes, deciding where fills and textures should appear, and selecting appropriate stitch types and densities. If you start with vector art, an SVG or EPS file, you can use vector-to-embroidery digitizing techniques to preserve edge quality as you scale. Thinking through edge accuracy early helps you set a solid foundation for the rest of the project.
For newcomers, a practical path is to treat each design as a small experiment. A beginner’s guide to embroidery digitizing emphasizes practicing with simple motifs, then comparing sew-outs to your onscreen expectations. Take notes on which stitches you choose for various regions and how density, underlay, and pull compensation affect the final look. This approach makes the transition from concept to stitch-ready file smoother and more repeatable.
Understanding the embroidery digitizing process
Understanding the embroidery digitizing process means breaking the task into clear phases: planning, digitizing, previewing, and exporting to a machine-friendly format. Start by selecting the artwork and deciding on stitch types, then map out underlays and edge definitions that stabilize fabric and control pull. Consider fabric type, hoop size, thread brand, and desired coverage, because these choices influence density and stitch balance.
A thorough review in the software environment lets you catch problems before sewing. Use a preview to simulate stitch order and coverage, and perform a test sew if possible. As you optimize, remember that the right combination of stitches for embroidery digitizing—outlines, fills, and underlays—can dramatically improve sharpness, durability, and fabric compatibility.
Choosing the right digitizing embroidery software
Choosing the right digitizing embroidery software sets the pace for your projects. Look for a package that matches your budget and supports common machine formats, color management, and both auto-digitizing and manual digitizing tools. The term digitizing embroidery software encompasses everything from beginner-friendly programs to professional suites with advanced libraries of stitch types and underlay patterns. A strong feature set saves time and reduces post-editing.
Before committing, test trial versions, review tutorials, and check compatibility with your printer or embroidery machine. Make sure the software offers reliable export formats (DST, PES, EXP, JEF, etc.), a robust stitch library, and intuitive color management. The right choice also includes accessible support and a clear path to learning resources, so you can quickly progress from curiosity to consistent results.
Manual vs. auto-digitizing: finding the balance for your project
Manual vs. auto-digitizing: finding the balance for your project means knowing when precision matters most. Manual digitizing gives you exact control over run lengths, satin outlines, and underlay placement, which is essential for complex logos or shading. Auto-digitizing can speed up repetitive parts, but often requires careful post-editing to avoid dense stitches or gaps. For logos and crisp text, you may rely more on manual digitizing, while letting auto routines handle simpler shapes or decorations, especially when the vector-to-embroidery digitizing path is straightforward.
A practical learning path is to start with small, simple designs to build intuition about stitch behavior, density, and pull. As confidence grows, gradually introduce auto-digitizing for non-critical areas while retaining manual control where detail matters most. For dedicated learners, the beginner’s guide to embroidery digitizing offers structured lessons on balancing automation with artistry, ensuring you preserve edge quality and fabric compatibility.
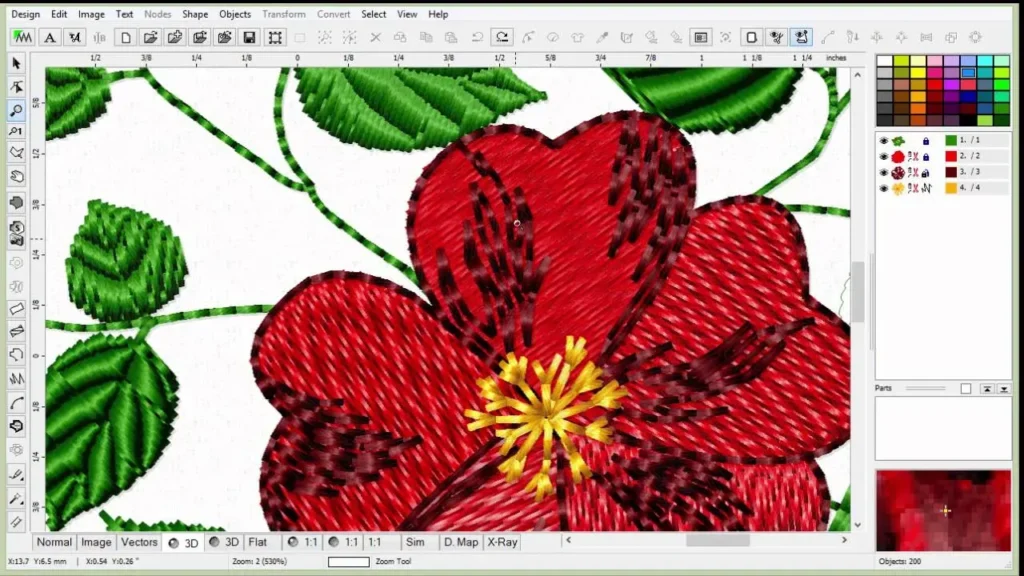
Stitches that work: run, satin, and fill
Stitches that work: run, satin, and fill form the backbone of most embroidery designs. Satin stitches outline shapes and edges with smooth, tight columns ideal for lettering and clean contours. Fill stitches provide broad coverage for large areas, while run stitches offer delicate detail and light-weight outlines. When planning, consider how each stitch type contributes to texture and durability.
Underlays, stitch density, and pull compensation all shape the final result. Centerline zigzag or edge run underlays stabilize fabric and minimize puckering, improving sew-out on a range of fabrics. Practice with small shapes to observe how density impacts coverage and fabric distortion, and adjust accordingly. These decisions are central to the stitches for embroidery digitizing workflow and can dramatically alter the professional look of your finished piece.
Test, refine, and color-plan: the final steps to a flawless sew-out
Test, refine, and color-plan: the final steps to a flawless sew-out mean moving from screen to real fabric with confidence. Run a test sew on scrap fabric to catch issues like thread breaks, fabric transparency, or over- or under-filled areas. Use this feedback to refine stitch types, density, and pull compensation before stitching the final piece. Planning color stops, thread brands, and underlay colors also helps maintain consistency across batches, and reduces rework when you switch fabric or lighting conditions.
Color management and thoughtful planning speed production and preserve artwork integrity. Export your final design in the machine’s native formats (DST, PES, EXP, JEF, etc.) and verify that color stops align with your embroidery machine’s library. For ongoing growth, consult tutorials and resources such as a beginner’s guide to embroidery digitizing to expand your toolkit and continue improving your craft, reinforcing the core ideas of the embroidery digitizing process.
Frequently Asked Questions
What is the embroidery digitizing process and how do I start with it?
The embroidery digitizing process is converting artwork into stitch paths that a sewing machine can stitch. Start by planning your design, ensuring high-contrast lines, and deciding whether to begin from a vector (SVG/EPS) or a clean bitmap. Choose suitable embroidery software, define stitch types and underlay, and export a machine-friendly file (DST, PES, EXP, etc.). Always run a test sew on scrap fabric to validate density and pull before final stitching.
What factors should I consider when selecting digitizing embroidery software for a beginner?
Look for digitizing embroidery software that fits your budget and machine formats, and that offers a balance of auto-digitizing and manual tools. Check the stitch-type library, color management, and export formats, plus accessible learning resources and good support. For beginners, prioritize intuitive workflows and helpful tutorials to build confidence as you translate artwork into stitches.
What is vector-to-embroidery digitizing and when should I use it?
Vector-to-embroidery digitizing takes scalable vector artwork (SVG/EPS) and converts it into stitch paths. Use vector sources to preserve edge quality when scaling, then define stitch types, underlay, and density for clean sew-outs. This approach works well for logos and line art where precision and smooth edges are important.
What are the best stitches for embroidery digitizing to achieve clean outlines and fills?
The right stitches for embroidery digitizing depend on the area and detail: satin stitches are ideal for outlines and edging, fill stitches cover larger areas, and run stitches handle fine details. Pair these with appropriate underlays (like centerline zigzag or edge run) and adjust density to balance coverage, fabric support, and thread weight.
How can I follow a beginner’s guide to embroidery digitizing to improve my results?
Start with simple shapes and gradually progress to more complex designs. Use the beginner’s guide to embroidery digitizing as a roadmap, practice manual digitizing to learn how stitches behave, and document the settings that work for different fabrics. Regular short practice projects and a post-practice test sew help you build consistent, quality results.
During the embroidery digitizing process, how should I approach testing and refining my design before stitching?
In the embroidery digitizing process, perform a test sew on scrap fabric to check density, pull, underlay effectiveness, and stitch balance. Adjust density, underlay, and pull compensation based on test results, then re-test until the sew-out looks right. Only export the final machine file after a successful test sew confirms clean coverage and stable stitching.
| Topic | Key Points |
|---|---|
| Introduction / Overview | Intro to digitizing embroidery design; purpose is turning artwork into stitched reality; audience includes makers, hobbyists, and small businesses; goal is clean, professional results and a quick-start foundation. |
| Plan-driven process | Start from design image or vector; decide stitch types; set underlay and satin where appropriate; export a machine-friendly file; quality depends on decisions at every stage. |
| Software selection | Choose software based on budget, machine formats, and learning resources; consider auto-digitizing vs manual, stitch libraries, color management, and export formats. |
| Manual vs auto-digitizing | Two approaches: auto-digitizing speeds workflows but often needs post-editing; manual digitizing offers precise control over stitches for better results, especially on complex shapes; start with simple designs. |
| Stitches and underlays | Use satin for outlines/edging, fill for large areas, run stitches for details; apply underlays (e.g., centerline zigzag) to stabilize fabric and improve durability; practice to learn density and pull. |
| Density, pull, fabric considerations | Density affects fill and puckering; too high = stiffness and needle deflection; too low = gaps. Pull compensation counters fabric stretch. Fabric type matters (knits vs. wovens); test on scrap fabric to fine-tune settings. |
| Color management & thread planning | Plan color stops, manage color changes to minimize breaks, export in the machine’s native formats, and align with the machine’s color library to reduce rework. |
| Test sew & refine | Run a test sew on actual fabric to catch issues not visible on screen; adjust stitch types, density, and pull compensation based on results. |
| Beginners’ tips & mistakes | Start with simple shapes; use consistent thread brands; avoid overly slender outlines and tiny fills; common mistakes include neglecting underlay, incorrect density, and skipping test sews; keep project notes for repeatability. |
| Practice projects & resources | Hands-on practice with simple motifs; use tutorials, guides, and forums to get feedback; regular short projects build confidence across fabrics, threads, and hoop sizes. |
| Next steps for improvement | Expand stitch libraries, learn for special fabrics (denim, terrycloth, lace), explore hybrid manual/auto workflows, and build a personal motif library with standardized settings. |
| Conclusion (summary) | The base content lays out a practical, plan-driven path to mastering embroidery digitizing, emphasizing planning, software choice, stitch types, density and pull management, color planning, and diligent testing to achieve reliable sew-outs. |